
If you are not currently a Denim Customer and would like to learn more Click Here
Overview:
Denim - Integration Setup
Step 1: Log into your Denim account.
Step 2: Obtain your API Key by navigating to "My Account" then scroll to the bottom and click "Generate API Key" as shown below:
%20-%20EZ%20Loader%20TMS%20-%20432%20new%20items%20-%20Slack%202026-08-06%20at%2011-54-15%20AM-jpg.jpeg?width=1317&height=547&name=Ben%20(DM)%20-%20EZ%20Loader%20TMS%20-%20432%20new%20items%20-%20Slack%202026-08-06%20at%2011-54-15%20AM-jpg.jpeg)
Step 3: Email support@ezloadertms.com with your API key and we will assist with connecting the integration.
Denim - Customer Profile Setup
Once the integration is active, you can select which customers you want to factor through Denim. For each customer you choose, update the customer profile settings as described below.
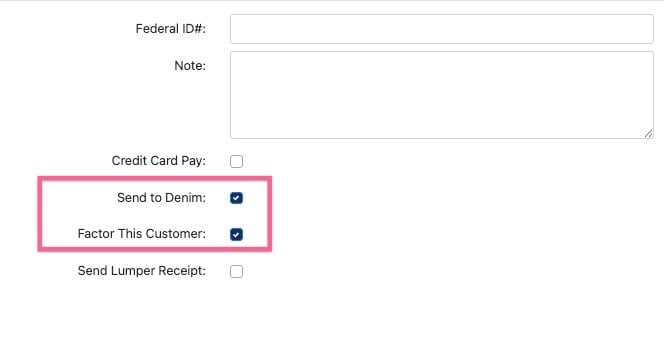
Step 1: Navigate to the customer profile you wish to factor > Accounting > Billing Card > select both the "Factor this customer" and "Send to Denim" checkboxes.
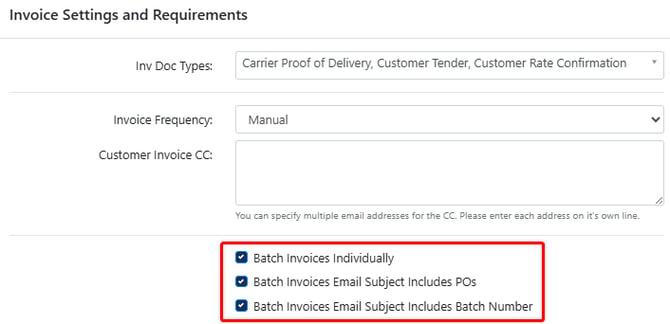
Step 2: Navigate to the customer profile you wish to factor > Accounting > Invoice settings and requirements card and check all 3 options listed below:
Denim - Submitting invoices to Denim
Note: This section assumes you have already received "Customer Credit Approval" from Denim for the particular customer you are planning to factor with Denim from EZ TMS.
First you will want to select which customer related supporting documents you want to be included in the invoice PDF packet transmitted to Denim. Within the documents section of a load profile trigger the "include in invoice" checkbox for any applicable documents.
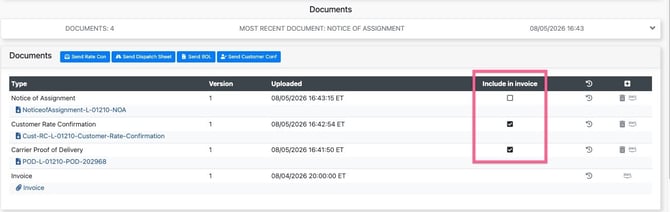
Note: Any of the carrier related supporting documents listed below will be automatically sent to Denim once the job is submitted regardless of the "include in invoice" checkbox.
-
Carrier Rate Confirmation
-
Carrier Invoice
-
Notice of Assignment
-
Letter of Release
-
Vendor Invoice
-
Vendor Rate Confirmation
-
Lumper Receipt
-
Internal Doc
Once the documents are sorted, the load is now ready for the Invoicing stage (i.e. The load is in "Received" status and can be found in the "Invoicing page" located on the left toolbar) an invoice batch must be created by selecting the paper airplane Icon next to "Customer Invoices Manual"
Note: A customer Invoice date, carrier received date and carrier due date must already be input into the accounting section of the load profile.
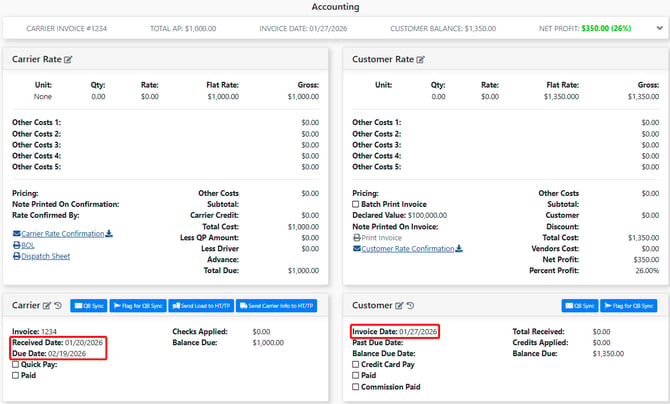

Once an invoice batch has been created, select the "cloud" icon to submit the Customer Invoice PDF packet to Denim. This Icon is visible under the Customer Invoices created section as seen below.

Managing Check Entries
There are a few options for managing check entries once a load has been submitted to Denim for funding:

1 - There is a setting which will automatically apply a customer receipt and carrier payment in full into the load profile as soon as the load is submitted to Denim. This setting is not recommended if you use QBO.
2 - You may manually enter check payments into the accounting section of the load profile.
3 - You can process check entries in bulk through EZ TMS's check management feature.